
Fresh bread at home feels comforting, but many first-time users feel lost when they open a new machine. Bread Maker Machine How to Use is simpler than it looks once you learn the right ingredient order, settings, and dough texture. I still remember my first loaf turning dense because I used cold water and too much flour, which taught me how small steps change the final bread.
This guide shares real tips, common mistakes, and easy fixes so you can bake soft, fresh bread at home with more confidence and less stress.
Bread Maker Machine How to Use
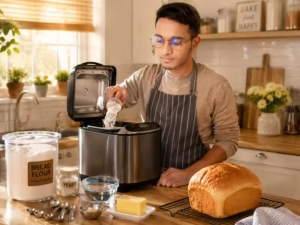
Fresh bread at home feels special. The smell fills the kitchen. The crust crackles. The loaf feels warm in your hands. A bread maker can do most of the hard work for you. That is why many busy homes now use one.
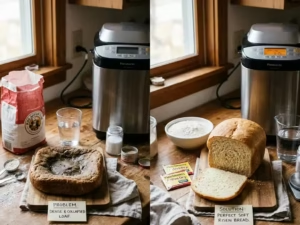
Still, many first-time users feel confused. The machine looks simple. Yet small mistakes can ruin a loaf fast. Too much flour, cold water, or old yeast can turn soft bread into a heavy brick.
This guide explains how to use it in a simple way. You will learn setup, ingredient order, settings, dough texture, cleaning, and common mistakes. You will also learn what bread machines do well and where they struggle.
Bread Maker Machine How to Use
What a Bread Maker Machine Actually Does
A bread maker mixes, kneads, proofs, and bakes bread in one automatic cycle.
A bread maker is like a tiny bakery on your counter. It mixes the dough, kneads it, lets it rise, and bakes it inside the same pan. You add ingredients and choose a cycle. The machine handles the rest.
Most beginners think the machine does everything perfectly every time. That is not always true. Bread makers still depend on correct measurements and good ingredients. A small mistake can change the whole loaf.
Bread makers also differ from oven baking. Traditional baking gives you more control over shaping, crust, and steam. A bread maker focuses more on convenience and steady results. It trades artisan style for ease and speed.
When Using a Bread Maker Makes Sense
A bread maker works best for busy homes. You can load ingredients at night and wake up to fresh bread. That feels almost magical the first time you try it.
Small families also benefit from bread machines. You can bake small loaves without heating a full oven. That saves time and energy.
Still, manual baking can work better for some people. If you love crusty artisan loaves or large batches, oven baking gives more freedom. Bread machines shine most when convenience matters more than bakery-style texture.
What You Need Before Starting — Bread Maker Machine How to Use
Essential Ingredients for Basic Bread
Bread flour, yeast, water, salt, and sugar form the base of most bread machine recipes.
Bread flour usually gives the best results. It has more protein than all-purpose flour. That helps the dough hold shape and rise better.
Yeast matters just as much. Instant yeast and bread machine yeast work best in most machines. Active dry yeast can still work, but some recipes need slight timing changes.
Water temperature also changes everything. Warm water helps yeast wake up. Cold water slows it down. Very hot water can kill the yeast completely.
Salt adds flavor and controls yeast growth. Sugar feeds the yeast and helps with browning. Butter and oil make bread softer and richer.
Optional Ingredients and Add-Ins
Seeds, nuts, and dried fruit can add flavor and texture. Many machines even have a beep that tells you when to add them.
Milk powder can make bread softer. Dough conditioners may improve texture and shelf life. Some advanced bakers use them often.
Gluten-free recipes need extra care. Gluten-free dough behaves very differently from regular dough. Many bread makers now include a special gluten-free cycle.
Required Tools and Preparation
| Item | Purpose | Optional or Essential |
|---|---|---|
| Measuring cups/spoons | Accurate ingredient ratios | Essential |
| Digital kitchen scale | Precision baking | Optional |
| Silicone spatula | Dough adjustment | Optional |
| Bread machine pan | Baking container | Essential |
One of the biggest reasons bread machine recipes fail is poor measuring. Too much flour can make the loaf dense. Too much water can make it collapse. A digital scale helps improve consistency.
Checking the Machine Before First Use
Before baking, clean the bread pan and kneading paddle with warm water. Dry them fully before use.
Make sure the kneading paddle locks into place. A loose pedal can stop proper mixing. I once forgot this step and ended up with flour stuck in the corners of the pan.
Check voltage compatibility if you bought the machine from another country. Also, avoid overloaded outlets or weak extension cords.
Read the loaf size limits, too. Overfilling a small machine can push dough into the lid and heating area.
Ingredient Order Matters — Bread Maker Machine How to Use
Correct Ingredient Loading Sequence
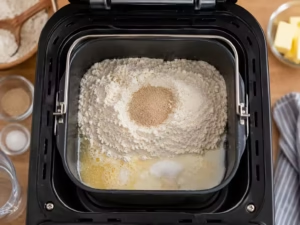
Most bread machines need liquids first, dry ingredients second, and yeast last.
Bread machines rely on timing. That is why ingredient order matters so much.
Most machines follow this order:
- Liquids first
- Dry ingredients second
- Yeast last
The yeast should stay dry until the mixing cycle starts. That delay helps control fermentation and rise timing.
Why Yeast Placement Changes Results
| Ingredient Placement | Possible Result |
|---|---|
| Yeast touches water too early | Premature activation |
| Salt directly on the yeast | Weak rise |
| Incorrect liquid ratio | Dense loaf |
Bread machines use timed yeast activation cycles. If the yeast starts too early, the dough may rise before the machine is ready. That often causes collapsed bread.
Common Measuring Mistakes That Ruin Bread
Overpacking fare is very common. Scoop flour gently into the cup instead of pressing it down.
Cold water can slow the rise too much. Guessing ingredient amounts also causes problems.
Expired yeast is another hidden issue. Many people blame the machine when the yeast is actually dead.
Step-by-Step Process — Bread Maker Machine How to Use
Step 1: Prepare the Bread Pan
Lock the kneading blade firmly and check pan alignment before starting.
Place the kneading blade inside the can. Make sure it locks correctly.
Some bakers lightly grease the pedal shaft to reduce sticking later. That can help when baking sweet or sticky dough.
Slide the pan into the machine until it clicks into place. A poorly aligned pan can affect mixing.
Step 2: Add Ingredients Correctly
Add ingredients in the correct order. Keep yeast away from liquids until mixing begins.
Break up flour clumps if needed. Large clumps can leave dry pockets in the finished loaf.
Do not overfill the machine. Dough expands more than many beginners expect.
Step 3: Select the Proper Bread Cycle
| Bread Setting | Best For | Typical Bake Time |
|---|---|---|
| Basic/White | Standard sandwich bread | 3–4 hours |
| Whole Wheat | Dense grain recipes | 4–5 hours |
| Quick Bread | Baking powder recipes | 1–2 hours |
| Dough Cycle | Pizza and rolls | 1–2 hours |
Cycle timing changes bread texture. Longer cycles improve gluten development and flavor. Fast cycles save time but often create denser bread.
Step 4: Choose Loaf Size and Crust Color
Larger loaf settings increase bake time and affect crust thickness.
Small loaves bake faster and use less energy. Large loaves need longer kneading and baking.
Crust settings also matter. A light crust stays softer. Dark crust becomes thicker and crunchier.
A medium crust works best for most first-time users.
Step 5: Monitor the Kneading Stage
Watch the dough during the first mixing stage if possible. The dough should form a soft, smooth ball.
If the dough looks dry and crumbly, add a tiny bit of water. If it looks wet and sticky, add a spoonful of flour.
This small adjustment step can completely change the final loaf.
Step 6: Cooling and Removing the Bread Safely
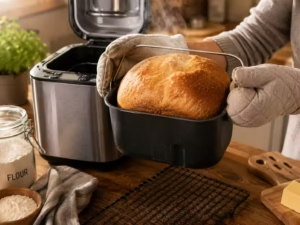
Remove bread quickly after baking and cool it on a rack to avoid soggy crusts.
Use oven gloves when removing the pan. Bread machine pans become very hot.
Turn the loaf onto a cooling rack. Let air move around the bread. That keeps the crust from getting wet and soft.
Wait at least 30 minutes before slicing. Fresh bread keeps cooking inside while cooling.
Bread Machine Settings Explained — Bread Maker Machine How to Use
Understanding Basic Bread Programs
The white bread mode works for most standard sandwich loaves. It is usually the best place for beginners to start.
French bread mode often creates a firmer crust and lighter interior. Sweet bread mode adjusts timing for sugar-rich recipes.
Gluten-free mode changes mixing and rise behavior. Gluten-free dough does not stretch like normal wheat dough.
Delay Timer Function and Overnight Baking
Delay timers let you bake later, but dairy and eggs should not sit out too long.
The delay timer is one of the best bread machine features. You can prepare the ingredients hours before baking starts.
Still, avoid leaving milk, eggs, or fresh dairy inside the machine overnight in warm rooms. That can become unsafe.
Simple white bread recipes usually work best for timer baking.
Dough-Only Mode for Advanced Use
Many owners ignore the dough mode, but it is extremely useful.
You can make pizza dough, cinnamon rolls, burger buns, and artisan bread dough with it. The machine handles the messy kneading stage.
Then you shape and bake the dough yourself in the oven.
Real-World Dough Behavior — Bread Maker Machine How to Use
What Proper Dough Texture Looks Like
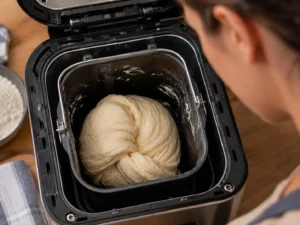
Proper bread dough should look smooth, soft, and slightly tacky but not wet.
Good dough forms a soft ball during kneading. It should not stick heavily to the pan walls.
Very dry dough struggles to rise. Very wet dough can collapse.
Hydration balance matters more than many beginners realize.
Environmental Factors That Affect Results
| Factor | Impact on Bread |
|---|---|
| Humidity | Sticky dough |
| Cold kitchen temperature | Slow rising |
| High altitude | Overriding risk |
| Hard water | Yeast performance changes |
Bread machines still need recipe adjustments because kitchens change with the weather and climate. A recipe that works in winter may behave differently during humid summer days.
Expectation vs Reality With Bread Machines
Homemade bread feels different from store-bought bread. It often has a thicker crust and denser texture.
Bread machines also make noise. The kneading stage can shake the counter a little.
The first few loaves may not look perfect. That learning phase is normal.
Common Problems and Fixes — Bread Maker Machine How to Use
Bread Did Not Rise Properly
Dead yeast, cold water, and the wrong flour are the top reasons bread fails to rise.
Always check yeast freshness first. Expired yeast causes many failed loaves.
Cold water slows fermentation too much. Weak flour may also reduce structure.
Bread flour usually rises better than low-protein flour.
Bread Collapsed in the Middle
Too much moisture often causes sinking. Excess yeast can also make the dough rise too fast.
Opening the lid during proofing can disturb the heat balance.
Try reducing water slightly if this problem repeats.
Dense or Heavy Bread Texture
| Possible Cause | Correction |
|---|---|
| Too much flour | Reduce the flour slightly |
| Old yeast | Replace yeast |
| Low kneading quality | Check paddle installation |
Dense bread usually connects to hydration problems or weak yeast activity. Even a tiny recipe change can improve softness.
Kneading Paddle Gets Stuck in Bread
The pedal sometimes bakes into the loaf. Use the hook tool that comes with many machines to remove it safely.
Avoid pulling hard with knives or metal tools. That can damage the nonstick coating.
Worn paddle coatings may also increase sticking over time.
Uneven Baking or Burned Crust
Voltage fluctuations can affect heating. Wrong crust settings may also overbake the loaf.
Check that the pan sits flat inside the machine.
If the crust burns often, try using the light crust setting first.
Safety and Machine Protection — Bread Maker Machine How to Use
Electrical Safety Considerations
Keep the bread maker on a stable counter and avoid overloaded outlets.
Place the machine on a dry, stable surface. Leave space around it for steam and heat.
Avoid weak extension cords. Bread makers pull steady power during baking.
Keep children away from steam vents during operation.
Preventing Internal Machine Damage
Never wash the base unit in water. Only clean the removable parts.
Avoid metal utensils inside the pan. They scratch the nonstick surface.
Protecting the coating helps the machine last longer.
Ingredient Safety and Storage
Store flour in a cool, dry place. Humid kitchens can cause spoilage.
Yeast should stay sealed and cool. Many bakers keep yeast open in the refrigerator.
Clean measuring tools often to prevent contamination.
Cleaning and Maintenance — Bread Maker Machine How to Use
Cleaning After Each Baking Cycle
Clean the bread pan after every use to prevent residue buildup and bad flavors.
Wash the bread pan gently with warm water and a soft sponge.
Remove crumbs from the machine after each bake. Crumbs near heating elements can burn later.
Wipe the lid and the steam area too.
Long-Term Maintenance Practices
| Maintenance Area | Recommended Frequency |
|---|---|
| Bread pan cleaning | After every use |
| Paddle inspection | Monthly |
| Seal and hinge check | Every few months |
| Deep cleaning | As needed |
Neglected residue can shorten machine life and affect bread flavor. Old grease and crumbs may even create smoke during baking.
Signs Your Bread Maker Needs Replacement Parts
A worn paddle shaft may wobble during kneading. Loose bread pans can also affect mixing.
Inconsistent heating may point to aging internal parts.
Very loud kneading sounds often signal wear inside the drive system.
Time, Effort, and Skill Level — Bread Maker Machine How to Use
How Long Bread Machines Usually Take
Most standard bread cycles take about 3 to 5 hours from start to finish.
Fast-bake cycles save time but may reduce flavor and texture.
Cooling also takes longer than many beginners expect. Fresh bread needs resting time.
Bread making is easier with a machine, but it still requires patience.
Beginner vs Advanced Bread Machine Usage
Simple white bread recipes are best for beginners.
Advanced users often experiment with hydration, grains, and custom cycles. That takes practice.
Once you understand dough texture, recipe customization becomes much easier.
Ownership Friction Most Buyers Ignore
Sticky recipes can make cleanup annoying. Bread makers also take counter space.
Replacement pads and pans may cost more than expected.
There is usually a trial-and-error phase before results become consistent.
Practical Usage Scenarios — Bread Maker Machine How to Use
Best Situations for Using a Bread Maker
Bread makers work very well for daily sandwich bread.
They also help with meal prep and budget cooking. Homemade bread often costs less over time.
People who dislike hand-kneading usually enjoy the convenience most.
When a Bread Machine May Not Be Ideal
Bread machines struggle most with large artisan loaves and bakery-style crusts.
Very crusty artisan bread often needs steam and oven heat control.
Large batch baking can also overwhelm small machines.
Professional bakery texture is harder to achieve inside a bread maker.
Realistic Cost and Convenience Expectations
| Factor | Bread Machine Reality |
|---|---|
| Convenience | Mostly hands-off |
| Electricity usage | Moderate |
| Ingredient savings | It depends on usage frequency |
| Bread quality | Consistent but recipe-dependent |
Bread machines save effort, but they still require cleaning, recipe testing, and maintenance. The convenience is real, though it works best with realistic expectations.
Advanced Tips for Better Bread Results — Bread Maker Machine How to Use
Improving Texture and Softness
Bread flour, fats, and milk can improve softness and texture.
Bread flour improves structure and chew.
Butter and oil soften the crumb. Milk often creates a richer flavor and gentler texture than water alone.
Small recipe adjustments can noticeably improve results.
Adapting Recipes Safely
Reduce liquids slightly when adding whole wheat flour. Whole grains absorb more water.
Sweet breads may need longer baking because sugar changes the browning speed.
Scale ingredient ratios carefully when adjusting recipes.
Underused Features Many Owners Ignore
Many bread machines can make jam and cake batter.
Some also support pasta dough and custom programming.
These extra features often stay unused even though they add real value.
Consultation
Define the Goal
The goal is simple. Help beginners use a bread maker safely and correctly.
The guide should reduce frustration during the first few levels. It should also create realistic expectations about bread quality and machine behavior.
Identify the Target Audience
This guide works best for beginner home bakers.
It also helps busy homes that want fresh bread with less effort. Many readers may be moving from oven baking to machine baking for the first time.
Refine the Content Idea
The focus stays on practical use instead of deep baking theory.
Real mistakes, troubleshooting, and ownership challenges matter more to beginners than advanced science.
Plan the content structure.
The article starts with setup and preparation.
Then it moves into ingredient handling, machine settings, and baking steps. Finally, it covers troubleshooting, cleaning, and advanced tips.
Optimize for Reach and Engagement
Natural keyword use helps search visibility without sounding forced.
Tables and short answer sections improve readability and featured snippet potential.
Simple steps also help with voice search and AI overview extraction.
Review and Improve
Always verify steps against real bread machine workflows.
Remove repeated advice and simplify complex wording when possible.
Troubleshooting should match actual machine behavior, not generic baking myths.
Track Performance
Watch which sections readers use most.
Troubleshooting tables and step-by-step guides often get the highest engagement.
Update the article as new bread machine models and user problems appear.
Performance: Bread Maker Machine How to Use
Performance depends on kneading quality, heating consistency, rise timing, and crust control.
Long-term durability also matters. Nonstick coating wear, vibration levels, and cleaning ease affect ownership satisfaction over time.
A good bread maker should feel dependable, quiet enough for home use, and easy to maintain.
Final Thoughts
Learning bread maker machine how to use takes a little patience at first. The early loaves may look uneven. Some may rise too much. Others may turn dense.
That is normal.
Once you understand ingredient order, dough texture, and machine settings, the process becomes much easier. After a few successful loaves, the machine starts to feel less like an appliance and more like a quiet kitchen helper.
Fresh bread at home still feels rewarding every single time.
FAQs for Bread Maker Machine How to Use
What is the correct ingredient order in a bread maker machine?
Add liquids first, then dry items, and yeast last. This order helps the bread-making machine work well and improves the rise and texture.
Why did my bread maker bread turn out dense?
Dense bread often comes from too much flour, cold water, or weak yeast. Accurate measuring helps bread maker recipes bake better.
Can I use all-purpose flour in a bread maker machine?
Yes, but bread flour often gives a softer texture and better rise. Bread maker machine recipes usually work best with bread flour.
How long does a bread maker machine take to bake bread?
Most bread maker cycles take about 3 to 5 hours. Quick modes are faster but may give less flavor and a denser loaf.
Do I need to watch the dough while the bread maker runs?
Yes, check the dough early in the kneading stage. A smooth dough ball helps the bread-making machine bake soft, even bread.
Why does yeast placement matter in a bread maker machine?
Yeast should stay dry until mixing starts. Early contact with water may affect the rise timing and change the bread texture.
Can I leave bread in the bread maker after baking?
It is best to remove bread soon after baking ends. Leaving it inside too long may create a soft or soggy crust.
What bread maker setting should beginners use first?
The basic or white bread cycle is easiest for beginners. It works well for simple sandwich bread and daily baking.
Can I make pizza dough in a bread maker machine?
Yes, dough mode works great for pizza dough, rolls, and buns. The machine handles mixing and kneading for you.
How do I clean a bread maker machine safely?
Clean the bread pan with warm water and a soft sponge. Never place the main bread maker unit in water or a dishwasher.
Read more articles:
How to Make Banana Bread in Air Fryer