
Steam cleaners can feel like a secret cleaning hack, especially when grime won’t budge. If you’re wondering how to use a steam cleaner, the key is simple: fill it with water, let it heat fully, steam in slow passes, and wipe as you go. I learned fast that rushing only leaves streaks and wet floors.
With years of home cleaning experience, I can say steam works great for tile, grout, and kitchen grease—so grab a microfiber cloth and start small.
How to Use a Steam Cleaner (Simple Guide for Beginners)
Steam cleaning feels like magic. You point the tool at dirt. Then you press the trigger. The grime loosens fast. A steam cleaner uses hot water vapor to break down dirt, grease, and germs.
Steam is great because it uses water only. No strong smells. No harsh sprays. But steam can also damage some surfaces if used the wrong way.
If you follow the right steps, steam cleaning becomes easy. It can save time and make your home feel fresh.
Step Context & Preconditions: How to Use a Steam Cleaner
When Steam Cleaning Is the Right Method
Steam cleaning is best for sealed hard surfaces, grout, and greasy messes where normal wiping does not work well.
Steam cleaning works best on stuck dirt. It is great for grime in cracks. It also works well on greasy spots. Steam is best when dirt is hard to remove with soap and water.
Steam is also helpful if you want chemical-free cleaning. Many people like that it leaves no cleaner smell. Steam cleaning is a good choice for allergy-friendly cleaning.
But steam is not always safe. Some surfaces absorb water. Some surfaces react to heat. If a surface can swell or warp, avoid steam.
Suitable surfaces and cleaning situations
Steam works well on:
- Tile and grout
- Sealed stone
- Sealed hardwood (carefully)
- Bathroom sinks and tubs
- Kitchen grease areas
- Glass (with the right tool)
Steam works best on sealed and hard surfaces.
When steam cleaning works better than traditional cleaning
Steam works better when:
- Soap scum is thick
- Grease is baked on
- Grout looks dark
- Germ-heavy spots need cleaning
Steam works best when dirt is stuck and hardened.
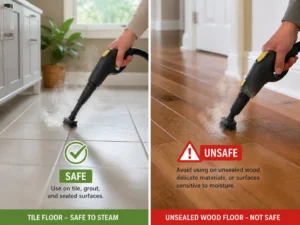
Situations where steam cleaning should be avoided
Avoid steam on:
- Unsealed wood
- Thin paint
- Soft delicate fabric
- Old wallpaper
- Water-damaged surfaces
If water can soak in, steam can cause damage.
Surface Compatibility Assessment
Steam cleaning is about surface safety. Hard floors are easier. Soft fabric is harder. Hard surfaces dry fast, but fabric holds moisture.
The biggest rule is simple. Sealed surfaces are safer. Unsealed surfaces are risky. If water can enter the surface, steam can ruin it.
Hard floors vs soft surfaces
Hard floors are easier to clean. They also dry faster. Soft surfaces like couches take more time. Soft fabric needs gentle steam and fast drying.
Steam on fabric is mostly for light cleaning. It can help remove smells. It can also lift surface dirt. But it is not a deep wash.
Sealed vs unsealed materials
Sealed surfaces block moisture. Unsealed surfaces soak it up. That is the key difference. Unsealed wood can warp fast from steam.
Household areas commonly cleaned with steam
Steam cleaning works great in:
- Bathrooms
- Kitchens
- Entry floors
- Upholstery refresh jobs
Bathrooms and kitchens are the best places to use steam.
Quick Surface Suitability Guide
Before starting, users benefit from knowing which surfaces tolerate steam safely.
| Surface Type | Steam Safe | Special Notes |
|---|---|---|
| Tile & grout | Yes | Ideal use case |
| Sealed hardwood | Conditional | Use low moisture |
| Upholstery | Conditional | Test fabric first |
| Carpet | Limited | Light cleaning only |
| Unsealed wood | No | Can warp and swell |
Surface prep prevents most beginner mistakes and reduces damage risk.
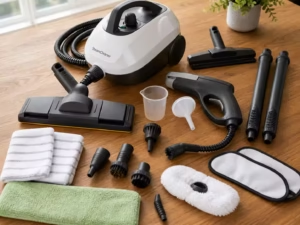
Required Tools & Materials: How to Use a Steam Cleaner
Essential Equipment
To use a steam cleaner safely, you need clean water, the right attachments, and a cloth to wipe dirt away.
Steam cleaners come in a few styles. Some are small. Some are large. The best steam cleaner is the one that matches your cleaning needs.
Small handheld units are great for tight spots. Bigger units are better for full rooms. Large units clean longer because they hold more water.
Steam cleaner unit types (handheld, canister, mop-style)
- Handheld steam cleaner: Best for grout and corners
- Canister steam cleaner: Best for big cleaning jobs
- Steam mop style: Best for sealed floors
Handheld is best for detail work. A canister is best for deep cleaning.
Water requirements (tap vs distilled)
Most machines can use tap water. But hard water leaves minerals behind. This can block the steam holes. Distilled water helps prevent buildup inside the machine.
If your kettle has white scale, your water is hard. That is a warning sign. Hard water can shorten the life of your steam cleaner.
Core attachments and their functions
Most steam cleaners include:
- Floor head
- Jet nozzle
- Brush tools
- Fabric tool
- Squeegee
Attachments help you clean faster and safer.
Optional Accessories That Improve Results
Helpful extras include:
- Microfiber cloths
- Small detail brushes
- Extension wands
- Protective gloves
Microfiber cloths are very important. Steam loosens dirt. Cloth removes dirt. Steam alone is not enough without wiping.
Attachment Selection Reference
Choosing the correct attachment determines cleaning effectiveness.
| Attachment | Best Use | Common Mistake |
|---|---|---|
| Floor head | Tile & sealed floors | Moving too fast |
| Jet nozzle | Grout & corners | Holding too close |
| Fabric tool | Upholstery | Over-wetting fabric |
| Squeegee | Glass & mirrors | Skipping wipe-down |
The right attachment improves results and lowers damage risk.
Set Up Preparation Workflow: How to Use a Steam Cleaner
Machine Preparation
Fill the tank to the correct level and wait until the machine is fully heated before using it.
Many people rush to set up. That causes problems. If the unit is not hot enough, it may spit water. Fully heated steam is stronger and cleaner than wet steam.
Steam cleaning works best when the pressure is stable. That happens after full warm-up. Waiting a few minutes improves cleaning results a lot.
Filling the water tank correctly
- Turn off the unit
- Unplug it
- Fill to the max line only
- Close the cap tightly
Overfilling can cause leaks and weak steam.
Heating phase expectations
Heating time depends on the unit:
- Steam mops: a few minutes
- Handheld units: about 2–5 minutes
- Canister units: about 8–12 minutes
Do not clean until the steam is steady.
Pressure and temperature readiness indicators
Many units have:
- A ready light
- A pressure gauge
- A sound or click
These signs help you know the unit is ready.
Environment Preparation
Steam works best on clean surfaces. Loose dirt should be removed first. Always vacuum or sweep before steaming.
Also, clear the area. Move small items away. Steam cleaning works better with space. Less clutter means fewer accidents.
Pre-vacuuming or sweeping requirement
Always vacuum first. Steam does not remove crumbs. It only loosens stuck dirt. Vacuuming makes steam cleaning faster and cleaner.
Removing fragile objects
Move items like:
- Rugs
- Small décor
- Loose items near edges
Heat and moisture can damage fragile objects.
Electrical outlet and cord safety
Keep cords away from water. Use a stable outlet. Do not pull the cord too hard. Cord safety prevents trips and electric risk.
Common Setup Errors
Common mistakes include:
- Overfilling the tank
- Using the unit before it heats fully
- Adding soap when the unit is not made for it
Most steam cleaner problems come from rushing.
Step-by-Step Process: How to Use a Steam Cleaner
Step 1 — Prepare the Surface
Clean loose dust first, then test steam on a hidden spot before cleaning the full surface.
Always start by removing loose dirt. Steam works best on stuck grime. Vacuuming first prevents mud and streaks.
Next, do a quick spot test. Pick a hidden corner. Steam it for a few seconds. If the surface changes color or swells, stop.
Step 2 — Heat and Prime the Steam Cleaner
Wait until the unit is hot. This step matters. Hot steam cleans better than warm steam. A fully heated machine gives stronger pressure.
Before cleaning, release steam into a cloth. This clears water from the hose. Purging helps prevent dripping.
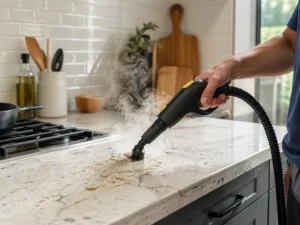
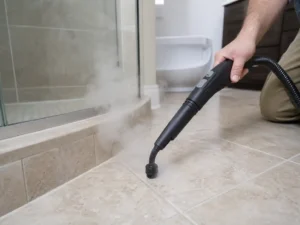
Step 3 — Apply Steam Correctly
Hold the nozzle a short distance away and move slowly in small overlapping passes.
Do not press the nozzle onto the surface. That traps moisture. It can also cause heat damage. Keep the nozzle 1–3 inches away.
Move slowly, like ironing clothes. Steam needs time to break grime. Slow passes clean deeper than fast passes.
Use short bursts on fabric. Use longer steam on grout. Steam control helps prevent damage.
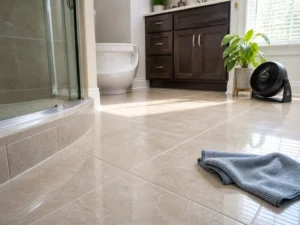
Step 4 — Lift and Remove Dirt
Steam loosens dirt. But it does not remove it. You still need to wipe. Wiping is the part that makes the surface truly clean.
Use microfiber cloths. Replace clothes when they get dirty. Dirty clothes cause streaks and spread grime.
Step 5 — Manage Moisture and Drying
Dry the surface fast using airflow, and do not walk on damp floors until fully dry.
Drying is part of steam cleaning. If you skip it, moisture stays behind. Moisture can cause a smell or mold. Fast drying keeps surfaces safe.
Use fans or open windows. Airflow speeds up drying. Drying prevents watermarks and streaks.
Performance Control & Technique Optimization: How to Use a Steam Cleaner
Speed vs Cleaning Effectiveness
Slow movement gives deep cleaning, while fast movement gives light cleaning.
Steam cleaning is slow on purpose. The heat needs time to work. Slow passes clean better than quick swipes.
Fast passes are fine for light refresh jobs. But they will not remove heavy grime. Deep cleaning needs patience.
Pressure Control Strategy
If your machine has steam settings, use low steam for:
- Upholstery
- Sealed wood
- Painted areas
Use higher steam for:
- Tile grout
- Bathroom floors
- Greasy kitchen spots
Lower steam is safer for delicate surfaces.
Heat Exposure Limits by Surface
Tile handles heat well. Wood does not. Some vinyl seams may lift. Some glue may weaken. If a surface is glued, heat can loosen it.
Always avoid holding steam in one spot too long. Too much heat in one place can damage finishes.
Expectation vs Reality in Deep Cleaning
Steam helps a lot. But it is not a miracle tool. It loosens grime and softens stains. Some stains still need scrubbing.
Old damage may not disappear. But surfaces will look cleaner. Steam improves cleaning but does not fix everything.
Technique Adjustment Guide
Proper movement improves sanitation and prevents surface wear.
| Technique | Result | Risk Level |
|---|---|---|
| Slow overlapping passes | Deep cleaning | Low |
| Holding steam in one spot | Heavy grime removal | Medium |
| Fast sweeping motion | Light refresh | Low |
| Too much steam exposure | Surface damage | High |
Good motion matters more than high steam power.
Verification & Success Check: How to Use a Steam Cleaner
Signs Cleaning Was Successful
A clean surface dries quickly, looks even, and feels smooth with no sticky film.
After steam cleaning, the surface should look clean. It should also dry fast. It should not feel sticky. Fast drying is a sign that you used the right amount of steam.
Check your clothes too. If it looks dirty, that is good. It means dirt lifted off. Dirty cloth means steam cleaning worked.
Signs of Incorrect Use
If you see streaks, you may have used too much steam. If wood swells, stop right away. If fabric stays damp, you over-wet it. Bad steam use often shows as moisture problems.
Also, check for odor. Damp smells mean the surface did not dry well. Lingering odor is a warning sign.
Error Handling & Troubleshooting: How to Use a Steam Cleaner
Steam Cleaner Produces Little or No Steam
This usually means the unit is not hot enough. It may also mean the tank is empty. Sometimes mineral buildup blocks steam flow. Weak steam is often caused by heat or scale issues.
Water Spitting or Dripping Issues
Water drips often come from condensation. This happens when the hose is still warming up. Purge the steam into a towel first. Purging clears water and improves steam quality.
Surface Streaking or Residue Problems
Streaks usually happen when pads are dirty. They also happen when dirt is loosened but not wiped away. Wiping is needed after steaming.
Over-Moisture Recovery Steps
If you over-wet an area:
- Stop steaming
- Wipe dry
- Use a fan
- Let it dry fully
Drying first prevents damage.
Quick Troubleshooting Table
| Problem | Likely Cause | Immediate Fix |
|---|---|---|
| Weak steam | Not fully heated | Wait longer |
| Water droplets | Condensation in the hose | Purge nozzle |
| Streaks | Dirty pad | Replace cloth |
| Slow drying | Too much steam | Add ventilation |
Most problems come from rushing or using too much steam.
Safety & Risk Considerations: How to Use a Steam Cleaner
User Safety
Steam can burn skin fast, so keep a distance, wear gloves, and never point steam at your body.
The steam is very hot. It can burn skin quickly. Treat it like boiling water. Steam safety is mainly about distance and patience.
Never touch the nozzle right after use. Let it cool first. Hot attachments can burn fingers fast.
Surface Protection
Some surfaces cannot handle heat. Some cannot handle moisture. Steam includes both. Always test first if you are unsure.
Be careful with:
- Vinyl seams
- Laminate edges
- Painted surfaces
- Glue-based materials
Steam can loosen glue and lift finishes.
Environmental & Indoor Air Considerations
Steam cleaning is chemical-free. That helps the indoor air. It is good for people who dislike sprays. Steam reduces chemical exposure inside the home.
But moisture must dry fast. Wet surfaces can grow mold. Ventilation prevents mold risk.
Time, Effort & Skill Level Expectations: How to Use a Steam Cleaner
Estimated Cleaning Time by Area
Steam cleaning is quick for small areas but slower for large floors because you must move slowly.
Steam cleaning saves effort, but it still takes time. You must do slow passes. You also need to wipe. Steam cleaning is slower than mopping, but it often cleans deeper.
Beginners may take longer. That is normal. With practice, it gets faster. Skill improves speed and results.
Time Expectation Overview
| Cleaning Task | Average Time | Difficulty |
|---|---|---|
| Bathroom tile | 20–30 min | Easy |
| Kitchen grease | 30–45 min | Medium |
| Upholstery | 15–25 min | Medium |
| Whole floor | 45–90 min | Easy |
Steam cleaning takes time because slow movement works best.
Maintenance & Aftercare: How to Use a Steam Cleaner
Post-Cleaning Machine Care
Empty the tank, clean pads, and store the unit dry to prevent odor and mineral buildup.
After cleaning, empty the tank. This prevents buildup. It also prevents bad smells. Leaving water inside can cause scale and odor.
Let the machine cool before storage. Clean the attachments too. Clean attachments prevent streaks next time.
Long-Term Maintenance
Hard water can clog steam holes. This reduces steam power. Descaling helps prevent this. Descaling keeps steam strong over time.
Store the machine dry. Replace pads when they wear out. Good storage prevents mold and damage.
Preventing Future Cleaning Difficulty
Steam cleaning works best as routine care. A quick steam clean each month helps a lot. It stops grime from building up. Regular light cleaning is easier than heavy deep cleaning.
Practical Usage Scenarios: How to Use a Steam Cleaner
Bathroom Sanitizing Workflow
Bathrooms are perfect for steam. Steam breaks soap scum and grime fast. Use the nozzle on the grout. Then wipe right away. Wiping after steaming keeps grout bright.
Kitchen Degreasing Scenario
Steam works great on kitchen grease. Heat softens grease so it wipes off. Work in small sections. Wipe each section right away. Small sections prevent grease from spreading.
Pet Odor and Upholstery Refresh
Steam can help reduce pet smells. But do not soak the fabric. Use light steam bursts. Let it dry fully. Dry fabric prevents odor from coming back.
Apartment vs Large Home Use Cases
Small homes do well with handheld steamers. Big homes benefit from canister units. Bigger tanks mean less refilling. Tank size matters for large cleaning jobs.
Ownership Reality & Long-Term Use Insights: How to Use a Steam Cleaner
What Marketing Claims Often Overlook
Steam loosens dirt, but you still need to wipe, and it does not replace vacuuming.
Steam cleaning is powerful. But it is not effortless. You still need to wipe dirt away. Steam lifts grime, but cloth removes grime.
Steam also does not pick up hair. It does not pick up crumbs. Vacuuming still matters. Steam is not a replacement for a vacuum.
Performance Under Heavy Household Use
Steam cleaners can last for years. But heavy use causes wear. Pads wear out. Brushes wear out. Seals may weaken. Frequent use means regular maintenance.
Who Benefits Most From Steam Cleaning
Steam cleaning is great for:
- Pet owners
- Families with kids
- People with allergies
- People who dislike chemicals
Steam cleaning is best for homes that need frequent deep cleaning.
Who Should Avoid Regular Steam Cleaning
Steam may not be ideal for:
- Homes with unsealed wood
- Homes with delicate flooring
- Very humid homes
High-moisture homes should be careful with steam.
Decision Factors Before Using a Steam Cleaner Regularly
Before using the steam often, check your surfaces. If your home has lots of tile, steam is a great choice. If you have unsealed wood, steam is risky. Surface type is the biggest deciding factor.
Also, think about storage. Some units are bulky. Some need pad washing. Steam cleaning saves chemicals but adds maintenance.
Final Thoughts: How to Use a Steam Cleaner the Right Way
Steam cleaning is one of the best ways to clean without chemicals. It loosens grime fast. It makes bathrooms and kitchens feel fresh. Steam cleaning works best when you move slowly and wipe often.
The biggest secret is simple. Do not rush. Use the right tool. Let things dry. If you respect heat and moisture, steam cleaning is safe and powerful.