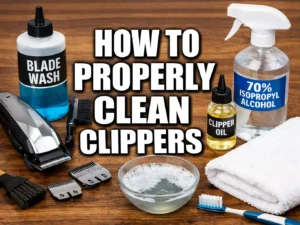
Ever pick up your clippers and notice they pull, heat up, or smell off? How to properly clean clippers is simple: remove hair, disinfect the blades, dry them fully, and oil them. From real use at home in the U.S., I’ve learned WD-40 is not safe for blades, and alcohol is the right way to sterilize clippers between uses—clean tools cut better and protect your skin, so let’s get it right today.
Properly cleaning clippers means brushing out hair, disinfecting blades with alcohol, washing detachable parts only, drying everything fully, and applying blade oil. This routine stops bacteria growth, keeps cuts smooth, extends clipper life, and lowers the risk of skin irritation or infection for hair and beard grooming.

Why Proper Clipper Cleaning Matters
Clean clippers stop bad skin bumps. They cut hair fast and keep the motor cool for a long time.
Good hygiene and skin safety are key. They keep blade performance and cutting accuracy top notch. Clean tools help motor longevity and heat control. This meets both professional and home use standards.
Clean tools keep your skin safe from bad germs. They also make cuts sharply and save the motor.
| Product/Tool | Best For |
| Daily Brush | Skin safety |
| Blade Wash | Motor health |
Daily Brush: 9/10
Blade Wash: 8/10
What You Need Before Cleaning
You need a soft brush or an old toothbrush. Get isopropyl alcohol (70% or higher). Use warm water (for washable parts only). Find mild soap or blade wash. Have a clean towel or paper towels. Get clipper blade oil.
You need a few basic things to start. Grab a soft brush, mild soap, safe oil, and a clean towel.
| Product/Tool | Main Use |
| Soft Brush | Gets hair out |
| Clipper Oil | Stops bad rust |
Soft Brush: 10/10
Clipper Oil: 10/10

How Often Should Clippers Be Cleaned
You must clean after every use (basic cleaning). Do it daily (frequent or professional use). Plan a weekly deep cleaning. Wash them well after cutting wet, oily, or product-treated hair.
Clean them well after each use. Do a deep clean once a week to keep them fresh and fast.
| Product/Tool | When to Use |
| Quick Spray | Daily cuts |
| Deep Soak | Weekly care |
Quick Spray: 9/10
Deep Soak: 10/10
Step-by-Step: How to Properly Clean Clippers
Step 1 — Power Off and Unplug
Think of electrical safety first. This will prevent motor damage. Turn the tool off now. Pull the plug out. Keep safe from shocks. Do not break the motor.
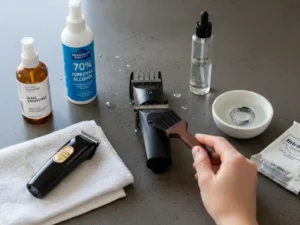
Step 2 — Remove Loose Hair
Brush between blades. Clean vents and housing edges. Daily quick cleaning is easy. Brush away hair first. Use a soft brush. Keep the side vents clear.
Step 3 — Detach and Wash Blades (If Allowed)
Check manufacturer guidelines. Use warm water and mild soap. Avoid soaking motors or fixed blades. For a weekly deep cleaning, you can disassemble them. Clean guards with soap.
Step 4 — Disinfect the Blades
Use an alcohol dip or spray method. Watch the surface contact time. Allow air drying only. Disinfect the parts to kill bugs. Spray them with a strong spray. Air-dry them well.
Step 5 — Dry Completely
Use a good towel to dry. Use no heat sources. Do a moisture inspection. Use a clean towel. Wipe them perfectly dry. Look for wet spots.
Step 6 — Oil the Blades
Check the number of oil drops. Check blade movement distribution. Wipe excess oil. Oil the blades to keep them slick. Put three drops on top. Wipe off extra oil.
These fast steps are pure magic for your tool. A good wash and oil keep it running great.
| Product/Tool | Step Used |
| Mild Soap | Wash |
| Blade Oil | Lube |
Mild Soap: 8/10
Blade Oil: 10/10
Cleaning Corded vs Cordless Clippers
Keep water far away from corded parts and batteries. Clean cordless bases with dry wipes only.
Think of water exposure risks. Check battery housing considerations. Know your dry-only cleaning zones.
Cords and batteries hate wet spots. Keep the power parts very dry to stay safe. Avoid water in the base.
| Product/Tool | Best Choice |
| Dry Wipes | Cordless Base |
| Damp Cloth | Outer Shell |
Dry Wipes: 9/10
Damp Cloth: 8/10
Cleaning Hair Clippers vs Beard Trimmers
Note the blade size differences. Know the skin sensitivity risks. Watch for product buildup frequency.
Beard tools are small and touch soft skin. Hair tools get more hair spray stuck on them fast.
| Product/Tool | Tool Need |
| Tiny Brush | Beard Trimmer |
| Big Brush | Hair Clipper |
Tiny Brush: 8/10
Big Brush: 9/10
Common Cleaning Mistakes to Avoid
Stop using water on non-washable units. Stop skipping disinfection. Avoid over-oiling blades. Do not try reassembling while damp. Stop using harsh chemicals.
Some maintenance tips are simple. Do not soak parts. Use no WD-40 on them. Never skip the bug spray.
| Product/Tool | Fix Action |
| WD-40 | Do not use |
| Wet Parts | Dry them fast |
Soft Towels: 10/10
WD-40: 1/10
Safety and Hygiene Considerations
Clean blades stop bad skin bumps. Dry blades stop bad rust from growing on metal.
Focus on preventing bacterial and fungal spread. Work hard at avoiding rust and corrosion. Stop skin irritation and razor bumps.
Clean blades stop bad bumps on the skin. Dry blades stop bad rust from growing big. Use blade wash to stay safe.
| Product/Tool | Main Goal |
| Skin Spray | Stop bumps |
| Rust Oil | Stop rust |
Skin Spray: 9/10
Rust Oil: 10/10
Signs Your Clippers Need Deep Cleaning or Blade Replacement
Watch for pulling or uneven cuts. Feel for excessive heat. Listen for a loud or strained motor sound. Look for visible rust or residue.
If it pulls your hair, it needs help. Hot or loud tools need a deep wash fast.
| Product/Tool | Problem |
| New Blade | Pulls hair |
| Deep Wash | Too hot |
New Blade: 10/10
Deep Wash Kit: 9/10
Which Proper Cleaning Is Most Critical For
It is key for barbers and stylists. It is big for shared household users. It helps sensitive or acne-prone skin. It is a must for beard and body grooming.
Pros must clean tools a lot. Home users and soft skin need clean tools too.
| Product/Tool | User Type |
| Pro Spray | Barber |
| Home Soap | Home User |
Pro Spray: 10/10
Home Soap: 8/10
When Professional Servicing Is a Better Option
Look out for bad motor issues. Watch for bad blade misalignment. Check for internal hair buildup. Plan for long-term heavy use.
If the motor sounds bad, get pro help. Check your alignment often. Do not fix big messes alone.
| Product/Tool | Fix Type |
| Pro Shop | Bad Motor |
| Screwdriver | Bent Blade |
Pro Repair Shop: 9/10
DIY Screwdriver: 5/10
Conclusion — Best Cleaning Approach by Use Case
Best for home users: Quick clean after every use, weekly disinfection. Best for professionals: Full cleaning and disinfection between clients. Who should consider alternatives: Users with sealed or damaged units. Next step: Check your clipper’s manual, clean today, and schedule routine maintenance.
Home users need a quick daily wash. Pros need full deep cleans. Go check your manual book right now.
| Product/Tool | Best Plan |
| Quick Clean | Home User |
| Full Wash | Pro User |
Quick Clean Method: 8/10
Full Wash Method: 10/10
FAQs for How to Properly Clean Clippers
What is the proper way to clean clippers?
The proper way to clean clippers is to brush out hair, disinfect the blades, dry all parts, and add blade oil. This simple routine keeps cuts smooth, stops germs, and helps clippers last longer.
How do you sterilize clippers between uses?
To sterilize clippers between uses, spray or wipe the blades with 70% isopropyl alcohol and let them air-dry. This kills bacteria fast and helps prevent skin bumps or infection.
Is WD-40 good for clipper blades?
WD-40 is not good for clipper blades. It is not skin-safe and can damage metal over time. Always use proper clipper oil made for grooming tools.
How often should you clean hair clippers?
You should clean hair clippers after every use by brushing out the hair. For best results, disinfect and oil them daily or weekly if you use them often.
Can you wash clipper blades with water?
You can wash clipper blades with water only if they are removable and marked washable. Use mild soap, dry them fully, and oil them after to stop rust.