
Your morning brew should be the best part of your day, not a chore. You should how often should you clean a keurig your Keurig by wiping the exterior daily, washing the reservoir weekly, and descaling every three to six months to keep it running like new. In my years of brewing, I have found that a little care stops the “old plastic” taste and keeps the coffee hot.
Trust these simple steps to protect your machine and your caffeine fix; let’s dive into the full guide below.

A Clean Keurig Makes Better Coffee
It’s early Monday morning. You are half-awake. You walk to the kitchen counter. You smell the coffee. But when you take a sip, it tastes weird. Maybe a bit like old plastic. Or maybe just stale. This is a sad start to the day.
A dirty machine ruins good coffee. It can also grow mold. That is gross. Cleaning your machine matters. It keeps the coffee tasting fresh. It makes the machine last longer. You will learn the best way to clean it here. We will cover daily steps and the big deep cleans. It is easier than you think.
| Feature | Details |
| Goal | Better taste, longer life |
| Time | 5 mins to 45 mins |
| Cost | Low (Soap, Vinegar) |
Importance Rating: 10/10
Your Keurig Cleaning Schedule
Not all cleaning is the same. Some things you do every day. Some things you do every few months. Let’s break it down.
Daily Maintenance
Best for: Keeping bugs and smells away.
You use the machine every day. So, you should wipe it every day. It takes one minute.
Daily maintenance includes removing used pods, wiping surfaces, and running a cleansing brew to rinse external parts.
Steps:
- Remove used pods: Do not leave them in. They rot.
- Wipe down surfaces: Clean the splashes.
- Rinse external parts: Wash the drip tray if it is full.
- Cleansing brews: Run a cup of hot water with no pod. This clears the spout.
Real-life context:
Do this while your coffee cools down. It becomes a habit fast.
Pros:
- Stops mold growth.
- Keeps the kitchen tidy.
- Coffee tastes fresh.
Cons:
- Easy to forget.
- Can feel tedious.

Description: Simple steps to keep your machine ready for the next cup. It stops the mess from building up.
| Task | Frequency | Time Needed |
| Remove Pod | Every use | 5 seconds |
| Wipe Tray | Daily | 30 seconds |
| Rinse | Daily | 1 minute |
Hygiene Rating: 10/10
Weekly Deep Cleaning
Best for: Removing hidden slime.
Water sits in the tank. Coffee spills in the holder. You need to wash these parts.
Steps:
- Removable parts: Take off the water reservoir and lid.
- Pod Holder Assembly: Take out the K-Cup holder carefully.
- Wash and Rinse: Use warm, soapy water. Do not dry with a cloth that has lint. Air-dry is best.
Sensory detail:
The plastic feels slippery? That is biofilm. Wash it off until it squeaks.
Pros:
- Prevents bacteria.
- Keeps water clear.
- Removes old coffee oils.
Cons:
- Requires drying time.
- Parts can break if dropped.
Description: A deeper scrub for the parts that hold water and coffee. This keeps the gross slime away.
| Part | Method | Note |
| Reservoir | Soap & Water | No dishwasher |
| Drip Tray | Soap & Water | Top rack safe |
| K-Cup Holder | Rinse well | Watch the needle |
Maintenance Rating: 9/10
Needle Maintenance (Every 2 Months)
Best for: Fixing slow flow.
Sometimes the coffee comes out slow. Or you get a short cup. The needle might be clogged. Coffee grounds get stuck there.
Steps:
- Unplug: Safety first.
- Locate Needles: Look for the entrance and exit needles.
- Paperclip tool: Use a straightened paperclip.
- Poke gently: Dislodge the grounds.
Real-life note:
If your cup is only half full, check the needle first.
Pros:
- Fixes flow issues.
- Ensures full cup size.
- Free fix.
Cons:
- Needles are sharp.
- Hard to see inside.
Description: Clearing the tiny tubes that puncture the pod. This ensures you get a full cup of coffee.
| Issue | Cause | Fix |
| Slow drip | Clog | Paperclip |
| Short cup | Clog | Paperclip |
| Grounds in cup | Clog | Rinse |
Utility Rating: 8/10
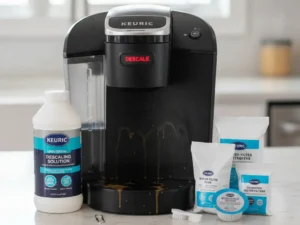
Quarterly Descaling (Every 3–6 Months)
Best for: Internal health of the machine.
Minerals in water build up. This is called scale. It blocks the pipes inside. You must remove it.
Descale every 3–6 months to remove mineral buildup. Watch for indicator lights and use proper descaling solutions.
Steps:
- Solution: Use the Keurig solution or white vinegar.
- Pour: Fill the tank with the mix.
- Brew: Run hot water cycles until empty.
- Rinse: Run fresh water cycles to remove the vinegar taste.
Personal touch:
The vinegar smell is strong. But a clean machine runs quiet and fast. It is worth it.
Pros:
- Extends machine life.
- Heats water faster.
- Removes bitter taste.
Cons:
- Takes 45 minutes.
- Smells like vinegar.
Description: Removing the hard water crust from the heater. This is vital for the machine to work.
| Water Type | Frequency | Solution |
| Soft Water | 6 Months | Solution/Vinegar |
| Hard Water | 3 Months | Solution/Vinegar |
| Filtered | 6 Months | Solution/Vinegar |
Critical Rating: 10/10
Key Signs Your Keurig Needs Cleaning
Even the best machine acts up. Look for these signs.
The “Descale” Light
The machine tells you. Do not ignore the light.
Slow Brewing
The pump sounds tired. The water drips slowly.
Bad Taste
Your coffee tastes sour. Or it has grounds in it.
Short Cups
You pressed 10oz. You got 6oz. The machine is clogged.
Description: Watch for these clues. They mean your coffee maker is crying for help.
| Sign | Meaning | Action |
| Light On | Scale buildup | Descale now |
| Slow Drip | Needle clog | Clean needle |
| Bad Taste | Dirty tank | Wash tank |
Alert Rating: 10/10
Common Cleaning Mistakes to Avoid
Small mistakes can break your machine.
- Leaving old pods: This grows mold fast.
- Skipping the rinse: Your coffee will taste like soap or vinegar.
- Dishwasher heat: Some plastic tanks melt in the dishwasher. Hand washing is safer.
- Ignoring the light: The scale will burn out the heater.
Light humor:
“Vinegar is for salad, not your morning brew. Rinse that tank well!”
Description: Simple errors that ruin the job. Avoid these to keep your coffee tasting great.
| Mistake | Consequence | Prevention |
| No Rinse | Vinegar taste | Brew water x3 |
| Old Pods | Mold growth | Toss daily |
| Harsh Soap | Plastic smell | Mild soap |
Caution Rating: 9/10
Conclusion – Keep It Clean for Good Coffee
Cleaning a Keurig is easy. It depends on:
- Daily: Wipe and toss the pod.
- Weekly: Wash the tank and tray.
- Quarterly: Descale the inside.
If you want fresh coffee, → Clean the pod holder. If the flow is slow → Check the needle.
If the light is on → Descale it.
Final thought:
“A clean machine makes a happy morning. Take care of it, and it will wake you up right.”
FAQs for how often you should clean a Keurig
How often should you clean a Keurig for the best results?
Wipe the machine each day. Wash the tank once a week. You must descale it every three months. This removes the hard water and helps the coffee taste very good.
What happens if I do not clean my Keurig often?
Germs and mold can grow inside. The water flow will slow down. Your drink will taste bad. The machine might stop working. You should clean it often to stay safe.
Can I use white vinegar to clean my Keurig?
Yes, white vinegar works well. Mix it with water in the tank. Run the brew cycle. Then run plain water. This removes the scale and the sour smell for a fresh cup.
Why does my Keurig coffee taste bitter or bad?
Old oils stick to the parts. Hard water leaves scale. This makes the cup taste bitter. Wash the tank and the needle. This will fix the bad taste and help flow.
How do I know if my Keurig has mold inside?
Look for dark spots in the tank. Smell the water. If it smells like dirt, clean it now. Mold grows in wet spots. Wash it well to be safe and keep it very clean.
The Afforio Team is made up of real experts with hands-on experience in Home & Kitchen, Smart Devices, Wellness & Care, and Gardening. We test every product ourselves and share honest, easy-to-understand reviews. Learn more on our About Us page or see how we test in The Lab.